How many rounds in a 10 round mag?

Five 1911 magazines – fully loaded

I shot a match in Oxford on March 9, 2013 (my 7th match ever).

I continue to have malfunctions with the 1911. At a previous match one of the guys suggested I might be limp-wristing but I really didn’t think I was. If so, it would be happening more frequently.  I think everyone felt my frustration as I had magazine malfunctions in two stages: rounds jam at the top and the magazine starts to fall out the bottom.

At this match, one of the RSOs was shooting the exact some gun that I’m shooting: the S&W 1911 in 9mm. I have slimmer grips but that’s really the only difference. He stopped to talk with me after the match. He asked if I could be hitting the magazine release? With my small hands I think not but it was a good question to ask on the way to solving the problem.

Then he asked a question I didn’t expect: How many rounds are you loading in the magazines? Huh? They hold 10 rounds and division capacity is 10 rounds so the obvious answer appeared to be: 10 rounds. Not so…

He told me he loads 9 rounds in each magazine. These magazines are so tight that having 10 rounds creates too much pressure, causing the slide to drag and “voila!” the appearance of limp-wristing. Almost everytime I’ve had a malfunction it was on the 2nd shot so I think his logic may apply to my situation.

I’m shooting ESP. The consensus was that I could do this. I need to shoot the entire match this way and inform the RSO up front. One of the folks we consulted seemed to think this might be in a gray area as far as the rules, but since I’m nowhere close to competitive at this point, I don’t think this will cause anyone any anxiety.

And I want to see if it makes a difference. So the next match, I’m downloading to 9 rounds and we’ll see if that reduces the annoying malfunctions.


The 1911 Saga: Cost

I took a defensive shooting / beginner competition class last October. The instructor insisted my gun did not fit my hands well. I really liked that gun (Springfield XD9) but I agreed. The same reasons are spelled out in these blog posts:

  • From the Cornered Cat: “Big” excerpt: “When a handgun is too large for you, it does not mean you cannot shoot the gun at all. Obviously, you can! And you can enjoy it, too. But a self-defense gun should fit your hand as perfectly as possible.”
  • From When the Balloon Goes up: “How to know if a pistol is too big (or too small)
I don’t like to spend money. I set financial goals for myself and a buffer that will let me ride out multiple months of unemployment is a requirement in my life. I rode the dot.com boom and bust in San Francisco for 10 years. That buffer helps me sleep at night.
The instructor recommended I purchase a 1911. If I couldn’t afford that, I should look at a S&W M&P 9. I’m very invested in learning to shoot well, so after agonizing over the decision, I opted to look at the 1911 options. Then I had to shop for one. For competition I wanted a 5″‘ barrel (more accurate) in 9mm (more affordable to shoot). I looked a local shops, online, asked friends about options and, about a month later I  snatched up the S&W 1911 in 9mm that appeared in the shop where I normally shoot. I paid cash to save about $40 in credit card fees.

Brand new 1911

Here’s the total so far to switch to the new gun:
  • $1290 –  for the gun and 2 magazines
  •     $90 –  1 Holster in green by Daranich Tactical (offset and dropped)
  •     $70 –  2 mag carriers in green by Daranich Tactical (offset)
  •   $129 –  3 additional Wilson Combat magazines (for a total of 5)
  •     $80 – 4 hour class on complete take down for a 1911
  •    $90 –  specialized cleaning tools and supplies from the take down class
  •   $156 – new grips, installed + two tools for take down + A Wilson Combat Take down Manual
Total: $1905

All the new gear.

I also spent $80 on a dropped offset holster for my Springfield XD9 to use until I got the 1911 purchases sorted out and $75 on a Woolrich Concealment vest. That brought my total expenditures, ignoring ammunition, to $2060 for October/November of 2012.

It took about 6 weeks to get the slim and get them installed. I basically had to start over learning to draw and to work the gun (because of the safety). I shot matches in late July, mid-September, and late October with my XD9. Due to these purchase and the new learning curve I didn’t shoot another match until January.

I haven’t taken any further classes and won’t until I can replace the cash I spent to switch guns. I still practice or shoot about once a week but no private or group lessons for now.
Was it a good decision? I’m not sure.

The down side: This gun is very finicky. The safety requires thinking about even more new things. It malfunctions easier. I have wasted lots of time at matches figuring out what’s wrong with my gun.

The upside: It’s thinner. More importantly, it’s heavier. I’m now able to shoot without re-positioning my hands on the gun between shots. When I’m ready to start shooting faster, the reduced recoil will help. The trigger is much lighter. I’m starting to take that for granted but it has surprised the friends that have shot this gun.

For now: I’m determined to learn as much as I can. I’m going to shoot with this gun for the rest of this year and then decide if I should be looking for something else.

First Caswell Ranch Match: 2/24/13


My GPS found Caswell Ranch with no issues. The website says “Look for big red dutch barn” and that was easy to spot from the road.

I was early enough to snap a few pictures, get good parking, register and find the bathrooms.

Beverly signed me in, made me feel welcome, and let me know about future training classes. Dean Brevit wasn’t there. I think he was at the 2013 IDPA Indoor National Championships. However, many of the men I met at the match mentioned Dean and all had very good things to say about training with him. I plan to attend the FUNDAMENTAL COMPETITION PART 1 & 2 classes once they are posted on the calendar.

And, one of the guys recognized me from this blog! That still seems odd. Most of the guys shooting know so much more than I do.

Stage 2: black parts of target are considered cover

Stage 2

My squad started on Stage 2. The scenario: see the 6 targets above. The black areas are considered cover and any shots into the black will not be scored. Best I remember, here’s what we shot:

  • Shoot 1 in each target from 10 yards, administrative reload
  • Shoot 1 in each target, from 7 years, strong hand only, administrative reload
  • Shoot 1 in each target, from 5 yards, week hand only starting from low ready (safety already off).
  • The time to reload and move forward was not part of the scoring.

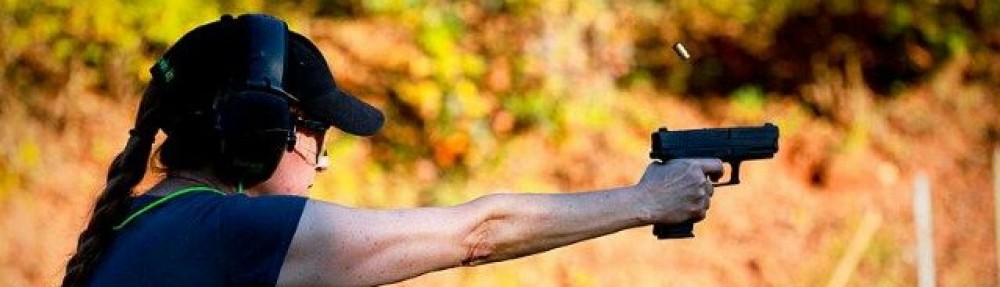
I was up early and managed to jam my gun after the first shot. I cleared one round, tried again, cleared another, and the Range Safety Officer (RSO) pointed out the magazine was loose. I never got upset but I was puzzled. He stopped the clock and told me we were going to start over. That’s not normal match protocol, but clearly this wasn’t going to give me an unfair advantage as I wasn’t going to win anything… but it did allow me to clear my head and focus on the stage. It was kind and appreciated. These matches aren’t sanctioned or this wouldn’t have been an option. Once I started over I ended the stage with no downs: all the shots were in the down zero area. I’m slow. But clearly my accuracy is improving. I ended the stage with a smile.

Skills

I do need to understand why my gun is jamming and dropping the magazine at matches. It doesn’t happen to me at the range when I practice, just at matches. In the last class I took, I learn to check these things after loading: tug the magazine, press check (verify a round is loaded by easing the slide back just enough to see it) and verify visually and by touch the gun is in battery (the slide is fully forward).

I have been skipping the “tug”. Adding a safety to the gun made the press check more complicated and all my attention has gone to that step. Turns out, at a competition when you are using a barney mag (with a single round to top off) there really is no need for the press check. The RSO at my last match in Oxford told me that but I didn’t understand why. The RSO at this match put it in simple terms: if there was one round in the magazine and you remove the magazine, where else could that round possibly be? Without the press check I can put the safety back on as soon as I load and leave it there.

So going forward, at a match, I need to focus on the magazine and battery checks. Hopefully that will address the issue I’ve been having. If not, there is more to learn. One of the RSOs thought I might be limp-wristing the gun but I don’t see how that could cause the magazine to come loose.

The Rest of the Stages

I look like a dork, but I have all my safety gear on and here’s the proof that it was t-shirt weather in February!

I didn’t take pictures of all the stages and I had no further malfunctions. For February, it was a beautiful sunny day. After getting very cold at the last Oxford match I brought several layers. I ended up wearing a t-shirt and a concealment vest. The sunshine was a real bonus.

My accuracy is definitely getting better. Here’s the number of downs for each stage:

Stage 1: 0 down, 2nd to last
Stage 2: 0 down, 2nd to last
Stage 3: 0 down, 2nd to last
Stage 4: 1 down, 4th to last
Stage 5: 10 down, 2nd to last (missed a shot)
Stage 6:  1 down, 5th to last
Over All: Dead last.

The guys on my squad were encouraging. “Work on your accuracy first, the speed will come”. The RSO reminded me to aim for the berm, not the ground, when pulling the trigger after unloading (thank you). We had stages with movement and one of the shooters took two of us aside to demonstrate the best way to move smoothly: walk heel-to-toe (which I knew) and at a slight crouch (which I wasn’t doing). Again, thank you. I used to compete in dancing and I know how to walk heel-to-toe (can you say waltz?) either forward or backwards, but the crouch makes all the difference.

Stages included these props and skills: We started one stage with our hand on the battery of a truck with the hood propped up. We shot bad guys using the truck as cover. One stage was set up like a bowling alley and we started by dropping a ball. Some stages required head shots. At least one stage required slicing the pie, another shooting in tactical sequence. One required kneeling behind cover. One required shooting all targets while seated at a picnic table. One required moving from a doorway, to a window, to another window.

Unlike Oxford, there is no place to put your gear except on the ground in the bays where stages are set up. I need to bring a ground barrier for wet days.

I had a few non-shooting conversations. Oddly enough, one was about climbing Mount McKinley. One guy in our squad was wearing a t-shirt from Alaska and that started up a conversation about the state and a comment from another shooter about wanting to climb the mountain. I’d made an attempt when I was younger so I actually had something to contribute. It was nice to be able to talk about something other than what I was doing wrong.

At the end of the day, just like all the matches I shoot, I was a happy camper. I’m starting to recognize faces, even if I’m lousy with names and I hope to shoot matches at Caswell Ranch on a regular basis.


Milestones & Match prep

Milestones

  • I took my NRA First steps Pistol just over a year ago: 2/12/12.
  • I shot my 6th IDPA match 2/24/13 at my 3rd IDPA venue: Caswell Ranch in Prospect Hill, NC.

Match Prep

Match bag – just the essentials.

The first 3 matches I shot were indoor matches. You bring your range bag, park it in a staging room, and leave it there. Weight really isn’t an issue. The last 3 matches I shot at outdoor ranges. You haul your bag with you from stage to stage and weight can become an issue. After my first outdoor match. I decided my shoulder needed a break and I wasn’t really using most of the items in my range bag. I decided to take a smaller bag, and haul only what I needed to the outdoor stages. I’m still fine tuning that, so here’s what I started with:

  • $3 Red & Black Flannel bag from Goodwill (because no one will mistake this for their bag and I liked the pockets),
  • 200 rounds ammo (the match states 100 rounds, but I like to bring extra),
  • plastic container to dump ammo into (easier to load from),
  • 5 magazines & the UpLULA,
  • water, reading glasses, notebook for note/reminders,
  • I added beef jerky before leaving the house.
  • I added eye/ear protection when I got to the range.

I still brought my regular range bag in the car as a back up, but this worked nicely getting from stage to stage. After shooting on Feb 24th I think I should add a small first aid kit. I like this approach and I’m going to stick to this plan for now.

Load ’em up!

I realized I should load the magazines before I left my house. That would be one less thing to do when I arrived at the range. I loaded 4 magazines to 10 round capacity and the 5th magazine (#1) with a single round. That magazine seems to have lower tolerances so I’ve opted to always use it as a the barney mag.

Since this would be my first trip up, I printed directions to the range. I checked the weather the day before and it looked like it would actually be warm: close to 60 degrees and sunny. The previous week had been cold, overcast, rainy and had snowed. I was trying to get over the flu and wasn’t up for a wet, cold day. I was nervous about going. Once again: a new place and I didn’t really know anyone. But I’d picked this weekend to go, the weather wasn’t going to give me an excuse to bail, so the next thing to decide was what to wear.

I got cold at the last outdoor match. One of the guys in my squad reminded me of wisdom I’d ignored: bring one more layer than you think you will need. I started with a t-shirt, added a long sleeved thermal shirt, a fleece jacket (a concealment garment & warmth), and I tossed in a Gortex jacket. I was determined I would not be cold at this match. I selected hiking boots and wool socks. I keep a hat, gloves and a scarf in the car. It was so warm I actually wore just the t-shirt and the Woolrich concealment vest I keep in my regular range bag. But I was prepared!

Securing the grip screws

Next, I needed to spend some time with my gun. I’d lost a grip screw at a previous outdoor match. I’d had that replaced and ordered the correct strength Loctite from Amazon, so it was time to secure the screws. I really didn’t think my gun smith was going to give me yet another screw after telling me how to deal with this problem. I punched the end of the thread locker with a “T” pin, grabbed the hex wrench and secured all 4 screws.

Google maps said it would take an hour to drive to the range but I wanted to give myself extra time to grab lunch and get lost, so I started out at 11am for a 1pm match. For future reference, 90 minutes would have been plenty of time. Also the last place to really grab fast food on the way to Caswell Ranch is on the far side of downtown Hillsborough.

Next post: the Match!

Packed and ready to go!


Shooting IDPA in Oxford, NC

I shot my 2nd match in Oxford on February 3rd. Here’s a summary of the experience:

When we were doing squad introductions, one of the guys said “You’re the GirlGoesBang blogger.” And I was floored. Someone other than family and close friends reads this blog… go figure? But I’m smiling as I write this (thank you!).  Another guy remembered me as the girl who tied up Honey Bunny!


I met the author of this book: Fall of the Republic by Jim Hicks. Jim was in my squad. I heard him talking with another guy on the squad about a survivalist fiction book. Since that is my favorite subject matter at the moment I asked about the book and it turns out he was discussing his book. I’ve added it to my reading list and will drop him a note once I’ve read it.

Now I have to admit something: I’m having trouble telling many of these guys apart. Many are trim, in khaki pants, vest and caps and have military type haircuts. I’m hoping I’ll start recognizing faces but twice I asked one fellow a question thinking he was someone else. It’s very embarrassing and I hope I’ll get better at recognizing the regulars.

I am really struggling with the 1911:
  • I nudge the safety up at times when I don’t wrap my short little thumb over the safety.
  • The magazines sometimes don’t seat right, and
  • at least 3 times the gun wasn’t in battery — because a round jammed — and I have no idea why.

I really, really miss the simplicity of my XD.


After the match, one of the guys in my squad suggested relaods with less recoil. Tunrs out they cost less than what I’ve been buying retail (well, they would if prices stabilized and he could get supplies again). And I can get a further discount for supplying my own brass. It appears all that brass I’ve been saving may do me some good even if I don’t reload myself.

After I was finished and headed home, I called Mom to check in with her. She went to her local range all by herself the day before. That’s a first for her! She’s in her 70’s so I have to say it: You are never too old to learn something new.

Notes on the Stages:
  • New for me, I started seated in a car and shot through the passenger window and driver’s window. There was no glass in the windows. I was advised to watch the steering wheel when moving the gun across the car.
  • I start another stage lying on the couch, in theory watching the super bowl. I shot two targets while laying on the couch and I found it very hard to aim. My body wanted to roll back into the cushions when I rocked forward toward the targets. I took a procedural penalty on this stage as I was supposed to reload before getting off the couch. In the excitement of the stage, I stood to reload. If this had been real I’d have made myself more of a target to the bad guys.
  • My last stage (the 3rd stage in the video below): I was very slow but I shot 6 targets and got no “downs” (all shots were in the targeted zones). That was a nice ending to my day!
Even better, here is video of the stages. The shooter who posted this video to You Tube, Ben, wasn’t in my squad. He’s a much better shooter than I am and he makes this look easy. I’m posting the video so you can get a first hand look at the stages:

The 1911 S&W defective grip saga

RoCo original grips

I bought a S&W 1911 in 9mm last October. I took it to my gunsmith to have the grips replaced. It came with RoCo wood grips in a medium width. I have very small hands so I selected a set of Halpern Ultra Slim Titanium grips. They were basically the same color as the gun so I considered that a bonus. See the gun with the new grips here.

As I’m learning to expect, I ran into a few issues. The bushings should have been attached to the frame of the gun. Two of the 4 were… the other two were attached to the wooden grips.

Halpern Ultra Slim Grips

My gunsmith advised me to send them back to S&W and ask them to remove the bushings from the original grips. If I want to sell the gun at some point, it is likely the next owner will have larger hands and will want to use these grips. I called S&W on November 19, 2012 and was told they would send me a return label and shipping instructions. The problem would be addressed. Why did I call? Because the website was broken. Really.

I received the return label Nov 24th, the day after Thanksgiving. I mailed the grips to S&W on November 29th, 2012. I received a set of replacement grips on February 15th, 2013. It’s a very good thing I wasn’t in a hurry for these, eh? They are missing the bushings and screws I returned with the original grips. So after almost 3 months from when I contacted them concerning this defect, I find I will be contacting them again. I sent email tonight requesting the missing parts. I’ll post an update if they ever show up.

 As for the ultra slim grips, my gunsmith had to cut out a place on the back of one side for the safety to swing up and down. He had to use special slim grip bushings as the new grips are much thinner than the original grips. I lost a screw in the first month. Was at the range, looked down and no screw in one of the holes. My gun smith gave me another (he is good to me) and then advised I invest in something like the “Turbo-Lock” pictured. Each time I clean that gun, threadlocker needs to be applied to the screws to ensure they don’t vibrate out.

S&W is teaching me patience. My gunsmith is teaching me to be self-sufficient. I’m not impressed with S&W and I’m learning to value my gunsmith.

Leverage your friends, they have cool guns too!

Sunday I agreed to go shooting with a friend I haven’t seen since I before I started shooting. He saw me on the news in an interview done by the local station and he reached out. I never feel I spend enough time at the range and I didn’t want to give up my structured practices to hang out with someone I wasn’t even sure was safe with guns… so I procrastinated.

Bad girl! Other than dealing with the chaos that is becoming normal on the weekend at a gun range, I had a good time. He has a nice collection of Springfield Armory guns. I let him shoot my 1911. Until I had to admit that my XD9 was really too wide for my hand, I loved that gun. It’s simple to use, reliable, and simple to clean. I shot a .40 and .45 caliber pistol for the first time. Very manageable.

I bought a 1911 with a 5″ barrel to replace the XD9 as my competition gun but haven’t yet bought a carry gun because there are just too many decisions to make and I don’t want to buy a gun I don’t end up liking and that I have not shot.

I walked away from shooting with my friend with a slam dunk of a choice. He has a Springfield XD-S in .45 calibre. It’s small, it’s thin, and it’s an XD! It’s a bruiser to shoot but I felt that with practice I could manage it nicely. It never jammed for him. It did jam for me, but I think I must have been limp-wristing the gun.

I made a decision early on that I wasn’t going to buy any more guns unless they were in 9mm. I don’t want to have to stock up on multiple calibers. My life, my decision.

Word from the SHOT show is that Springfield will be producing this gun in 9mm in the spring. I want this one. Easy, easy decision. To make it even easier, holsters should already be available as the .45 holsters should also fit the 9mm model. Win!

Now, I need to figure out how to get on a list somewhere to order this as I get the impression it will be popular.

For my reference, here is a review:
http://www.thefirearmblog.com/blog/2013/01/15/springfield-xds-9mm/


New Year, New Match

I missed the IDPA matches nearest where I live in November and December due to family holiday obligations. I am also getting used to the 1911 I bought and was finally able to shoot in mid-November (after getting the grips downsized). I’m not used to a gun with a thumb safety and I can’t say I’m a big fan at this point. However, I bought the gun, I paid a twice what I’ve paid for any other gun and I want to spend the time to give it a fair assessment.

So after 7 trips to the range to practice things that are new with this gun like the grip and draw with a thumb safety, I decided to shoot an outdoor match at The Range in Oxford today. This was my first outdoor match and the first match I’ve decided to shoot and not arranged to meet a friend there. I did email Frank to ask about the calendar and confirm what time the match started. I told him I’d be there as I wanted to make a commitment to someone. I’ve found that knowing I’m accountable to my word is a strong motivator for me and I was very nervous about this due to the new gun, new range, and no friends for moral support.

This morning it was raining as I left my house but was clear as I arrived at The Range. The first lesson of the day is that registration starts at 11am but the match doesn’t start until 1pm. I’ll be targeting a 12:30 arrival in the future.

I wasn’t sure what to wear as it was just over freezing when I left my house. Ideally I wanted to tuck in everything but my concealment garment. By 1pm it was warm enough to easily do that but I might consider a larger pair of jeans to be able to manage that with thicker layers on colder days. I used a fleece vest as a concealment garment today and that worked well.

I brought no food or water. I did eat a substantial breakfast and they sell bottled water at a bargain (50 cents), but I should be more self sufficient. Beef jerky, granola bars, or something portable would be a good idea.

My range bag is heavy. At an indoor match I’d park it in the room where we wait for an open stage and come back to it between stages. At an outdoor match you haul it around. The only thing I really needed was ammo and my UpLULA (for me an absolute necessity). In the future, I think I’ll leave the range bag in the car and bring a smaller bag from stage to stage with just food, water and ammo.

I attended a safety briefing for “new shooters” and was reminded to put on the gun & holster at the car then DO NOT take the gun out of the holster until I get up to the line to shoot. It stays in the holster until I put it back in the car at the end of the match.

They split us into 6 squads and started us in one of 6 bays. Our squad started in Bay 2. We proceeded to 3,4,5,6, and 1. It went fairly quickly. There were about 10 shooters per squad so about 60 folks competing.

Here’s how it went for me:

  • The thumb safety caused me all kinds of issues. I had not practiced loading a barney round then doing a chamber check. I loaded the first round. The RSO says, “put on your safety”. I pulled the empty mag out and put in the full mag. I went to do a chamber check and it turns out you can’t if the safety is on. I worked this all out but it flustered me enough I didn’t check that the mag was seated and…. of course…. it wasn’t.
  • I ran into multiple issues on the 2nd stage I shot. At one point I did a tactical reload and popped the partially full magazine in the waist band of my jeans. I must I pushed a bit harder than usual as the next thing I felt was the magazine snaking down my leg until it hit the ground. Another first!
  • I was more accurate than previous matches, at the cost of speed. But for now I’m happy with that trade-off.
  • I had a few conversations with other shooters and felt that the Range Safety Officers were supportive.

It was a good day!


Holding On: 1911 vs XD9

XD9 and 1911 width comparison.
– 1911 is .960 inches
– XD9 is 1.19 inches

I bought a 1911 recently. I decided not to shoot it until I replaced the grips and was able to slim down the gun. I picked up the new gun with the new grips on Tuesday November 20th, 2012. I’m still focused on learning to maintain my grip through multiple shots and I was hoping this gun would make it easier for me to do that.

It did! I managed to keep my hands on the gun, in the same exact position for more than one shot. It’s going to take practice, focus, and work to improve my hand strength but If I can do it once I know I can do it again.

The 1911 is a thin frame with a single stack magazine. The grips can be swapped out to slim down or add width to fit the shooter’s hand. The advice I followed insisted that a 1911 was the best choice for my small hands. I can now feel the difference that makes. I asked the gunsmith that swapped the grips for me to measure the width of both guns, The difference is .23 or almost a 1/4 inch. That difference makes it easier for me to keep the thumb of my strong hand pointing forward. With a wider gun I tend to twist my hand toward the trigger side to ensure I could reach the trigger.

The 1911 is heavier too, so there is less recoil. This may be doing more to stabilize my grip then the reduced width. I weighed the 1911 and the XD9 I’ve been shooting. Using a kitchen scale and unloaded guns (no magazine), I found the 1911 to be almost a pound heavier (15.2 oz). I can tell the gun isn’t moving as much when I shoot and that is definitely giving me more control.

1911 weighs in at 2 lbs 8.5 oz (40.5 oz)

XD9 weighs in at 1 lb, 9.3 oz (25.3 oz)

To focus on my grip and include target transition, I shot steel plates. Knock them down, set them back up. Over and over. 10 plates, 10 round magazines and 124 rounds means just over dozen times resetting the plates.

When I missed a plate it was usually because I slapped the trigger. So the next shot I focused once again on proper grip, a tight supporting hand, relaxing the dominant hand, then gently squeezing the trigger. The more I practice this “transition” from “I missed….” to “relax and focus” the better I’ll be able to recover in a stressful situation.

Things I noticed the first time I fired this gun:

-The trigger is scary light for me. I’m having trouble finding the trigger reset because there is very, very little back travel to reach it.
-I need to practice with the safety. I managed to nudge it on while shooting and then had to stop to trouble shoot why the gun stopped firing. The XD9 has a grip safety and nothing to flip up/down. This is a new process to add to my draw.
-The magazine is a tight fit and in one case I failed to insert it far enough. Once again I stopped to trouble shoot the issue. In this case I felt foolish as I had not gone through the  “click, tug, press, battery” check list I learned in my recent defensive handgun class.

Day 2 of 1911 Practice: 

Roughly a week later I was back at the range and once again focused on my grip. This trip I got a lane and shot paper.
– I hate to admit it, but I had an accidental discharge (pointing downrange) because the trigger is so light. It was a scary reminder of one of the 4 IDPA safety rules: Keep your finger off the trigger until you are ready to shoot. 
– I’m still nudging the safety up while shooting. At least now I know why the gun just stopped shooting and can work to stop this from happening.
– I was able to shoot almost an entire magazine with no shift in my grip. That’s progress!
– Since I was unable to work on target transition in a lane, I started working on keeping both eyes open while I shoot. Since my focus is defensive scenarios, that is yet another skill I need to work on.


Breaking in the 1911 Magazines

I bought a Smith  & Wesson Pro Tactical 1911 in 9mm two weeks ago and I haven’t shot it yet. I bought the 1911 because the instructor of one of the classes I took recently insisted that I needed a gun that could be adapted to small hands. With a single stack and modular grips, the 1911 is the best candidate. I’m still waiting on the slim grips I ordered to come in. Until they do, the gun will remain a virgin.

I ordered all the accessories I’ll need to compete in IPDA with the new gun: A Kydex holster dropped and offset, two Kydex mag holsters also dropped and offset, and 3 extra Wilson Combat magazines. Two came with the gun, so this gives me a total of five magazines: 3 for competition, 1 for a Barney mag, and one extra because, well, I was told it’s always good to have a spare.

The new news today: you need to break in the magazines. I ordered them from the instructor that advised the 1911 purchase. When I picked them up today, I found out that the new Wilson Combat mags are too tight initially and may cause the gun to malfunction. The way to address that issue is to load them to full capacity and let them sit like that for at least 3 weeks. As of tonight they are loaded and “breaking in”.

Another tip I got was to number the magazines. If the gun starts to malfunction this will allow you to check to see if it’s always the same mag. If so, it might be the mag, not the gun with issues. One of my instructors uses marker pens, another uses fingernail polish. I have had a bad experience with fingernail polish and guns, and I didn’t own a marker pen, so I opted to use my label maker. I labeled the back spine as I don’t touch that surface when I load. I’ll report back if that turns out to be a bad decision.