Trigger Control

I shot a match last Monday night (July 20th, 2015). I had put about 120 rounds through the 1911 since I got it back from S&W and it had worked flawlessly, so I decided to shoot it again in a match. I switched from a USP Compact (a DA/SA gun) to a 1911 (a SAO gun). In more specific terms:

  • DA/SA is a double action trigger pull followed by single action trigger pull. The first trigger pull has to both cock and release the hammer. When the gun fires, the action of the slide cocks the hammer for subsequent shots. So the first pull is long and heavy. Subsequent pulls are light and short in comparison.
  • SAO shoots in single action only. My 1911 has a factory trigger but it’s light at about 3.25 pounds.

To increase my speed with the USP Compact I worked to prep the trigger as I was extending the gun for the first shot. When I shot the first stage of the match I had an AD (accidental discharge). I pulled the trigger after the gun was out of the holster and pointed down range but well before I intended to pull the trigger. The habits built with the H&K were not transferable to the 1911. Here are stills of the first accidental shot and the first intended shot:

AD & 1st Shot-vertical

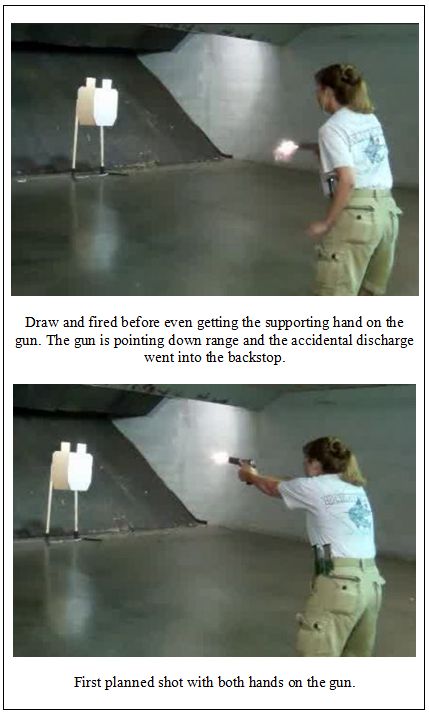
The RSO noted that at matches with more structured rules I would have been disqualified. I would not have argued with that. Since the shot went into the backstop they did let me continue to shoot. The rest of my match went well.

This was a huge wake up call to focus even more on my draw and where my trigger finger is at all times. To pull the still of the AD, I found a way to step through the video in slow motion. I then saw all the extraneous movement in my draw and alignment for the first shot. That was another eye opener. When I watch it at full speed I don’t really see all the small movements, but in slow motion it becomes very clear.

I’ve included the video of the match. I’ll be shooting these stages again next Wednesday night. The Wake County Range will be closed for most of August for cleaning and renovation. The next Monday match will be in September.

Magazines: More Lessons Learned

Here’s a bit more on the magazines I swaped by accident yesterday:

Single stack 1911 on the left. Double Stack XD9 on the right.

These are very different magazines. This photo shows the width difference well. The other difference is the capacity. The 1911 maxes out at 10 rounds. The XD9 will carry 16. So why did I buy the 1911? A single stack magazine results in a narrower grip. And I have very small hands.

Extractor from my 1911.

Since I had my gun, but no magazines, one of the guys working at the shop joked about, “taking the time to make lots of single shots” and I jumped on that comment. I’d always wondered if you could load a semi-automatic by placing a round in the barrel.  (Note: if the terminology is incorrect please do correct me in the comments!).

Since none of the classes I’ve taken has mentioned this I thought it might be a dangerous practice but if I’m ever in a situation where I have a gun, no magazine and a pocket full of rounds I would want to know the answer. So of course I asked.

The answer: it’s possible but can damage your extractor. Typically the round slides in from behind the extractor and the rim slips into the lip of the extractor. If you hand load the round and then close the slide, the lip of the extractor is forced over the rim of the round from behind the round.

Long story short: you can do this but it may damage the gun over time by breaking the lip off the extractor. I found more discussion here.

A final comment about my visit to the shop yesterday: some of the staff are becoming friends. I show up on a regular basis, I’m willing to listen to many opinions, and I always try to be upbeat and positive when I’m there. It’s a good feeling to see friendly faces when I walk in the door.


Magazines: Lessons Learned

I drove to the range yesterday to send some lead down range after work. After I arrived I realized I’d brought the wrong magazines. I’ve been keeping sets of magazines in ziplock containers.

Can you tell the difference? Clearly I could not. One of these had 4 double stacked XD magazines, the other has 5 single stack 1911 magazines.

I brought a container of 1911 magazines with the Springfield XD9. Bummer. I did not shoot on this visit.

How did I manage to do this? I’ve been drinking from the fire hose in my quest to learn and haven’t slowed down to regroup. In this case I should have dumped out my gun bag after the 1911 Take Down class I took last weekend and inventoried what’s in the bag.


So what’s the good news? I now have enough guns that I’m fortunate enough to have this problem. (I try to stay positive!).

This should work much better!

I treat every visit to this range as an opportunity to talk to knowledgeable folks and learn. Two of the guys that I see the most in the afternoons had walked me through taking my magazines apart a few weeks back on a slow day. I followed up yesterday with a final question about the direction to place the small end of the spring in the follower.

II’d taken them apart and cleaned them up, then took my best guess at putting them back together. I even shot a match with them last weekend and all seemed to go well, but I still wanted to confirm my technique. Since I hadn’t brought the right mags with me this trip, he was kind enough to pop a similar mag out of a rental gun to examine. He let me take it apart and show him the two options. He confirmed my choice was correct.

Alignment on the left is correct: it’s vertical when flush in the follower. Alignment on the right is wrong: it angles to the right of vertical.

The new Silicon cloth for magazine maintenance.

I picked up a silicone cloth to “lubricate” my magazines. In a recent class I attended I was advised that these cloths were the best way way to keep magazines working well. First take them apart and wipe off the dirt and grime with a clean dry cloth. Then run this silicon cloth through the inside of the magazines, around the outside edges of the follower, and up the spiral of the spring. The cost was roughly $5. And one the guys at the shop reminded me: don’t put them in the washer. He said you’d be surprised at how many people do that, then realize: “no more silicon“.

And finally, I stopped in to see the resident gunsmith. We are becoming fast friends. He has already fixed a serious issue for me and never seems to tire of my endless questions.

I’ve been waiting 4 weeks to get the slim grips we ordered for my new 1911. He called this week and was told they are on back order. So I asked if we could order from a different supplier. Turns out he has a dozen or so slim options in stock, but had not mentioned that as he thought I wanted the specific grips I originally selected.

I’m so glad I asked. He has several I’d be happy with, so I’ll be taking the 1911 to him next week and finally get the gun set up to shoot.

All in all a productive trip, even if I didn’t get to shoot.


Learn from my mistakes: I painted my gun shut. Really…

I took a 16 hour defensive handgun class locally: 4 days, over 2 weeks, 4+ hours each class. Snap caps were required for malfunction drills. Snap caps are essentially dummy rounds to allow dry fire without damaging the firing pin or to mix with live rounds to force malfunction drills. In this case we were required to have 5 snap caps, 3 mags and live rounds. We swapped these with another student and loaded a mixture of live/dummy rounds. Then when we shot we weren’t sure if/when a malfunction would occur. Not every mag was fully loaded and not every mag had to contain a snap cap.

After all 8 students had exhausted all magazines there was a mix of snap caps and brass all over the range floor. I wasn’t quick enough at spotting snap caps on the floor. The result: I was down 3 snap caps at the end of the night. At $3 apiece I wasn’t too happy about that.

I bought another 5 snap caps from the instructors and asked for suggestions to avoid this in the future. One of the instructors suggested I mark my snap caps. She mentioned the words “fingernail polish”.

I’m not a fingernail polish kind of girl. I have painted my nails a few times in the past but I can chip them in an hour flat and don’t see the point. I’m setting the stage for what comes next…

I bought bright green paint. I painted a band around the long part of the snap cap. My thought process was this: I could spot my rounds before I ever picked them up. I let them dry for 45 minutes. The bottle advised 10 minutes for nails so this seemed sufficient.

I loaded a mag and intended on practicing tactical reloads and slidelock reloads. That never happened. The slide would not budge. I loaded one round and that “painted it shut”.

This was on a Thursday night. I had my last class Saturday evening. I was trying to figure out who I could get to look at the gun on Friday and if it was still stuck, what I could use in class instead. It was not a happy evening.

I lucked out and the gun smith at the range I frequent was in on Friday. He works part-time so I was feeling lucky. I had to take time off work and endure a bit if humiliation, but he forced the slide open and cleaned the barrel for me. He showed me two handed technique he used: rocking the barrel until it popped open.

Of course, my instructor happened to stop by the shop while I was getting this issue addressed. Of course.

But I learned a good lesson. I have a great story to tell. And I made a new friend. The gun smith is never going to forget me.

What did I do with the new snap caps: I painted the ends where the firing pin hits. I used a very thin coat of paint and let them dry over night. I came home form the last class with all of my snap caps!

MY red snap caps with green bases!