I picked up defensive rounds from 9 Forward at the Cup last week. I rode up to Oxford with a practice partner Saturday morning (June 27th) and one of my goals was to try the defensive rounds in the two guns I rely on for defense.
Using the “Library” for Ballistics Testing
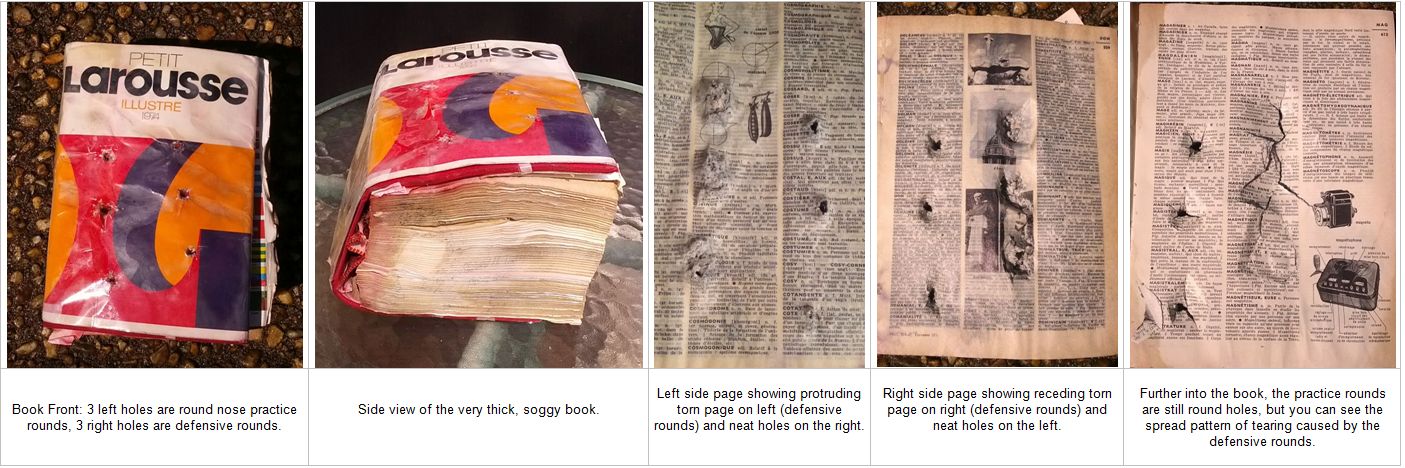
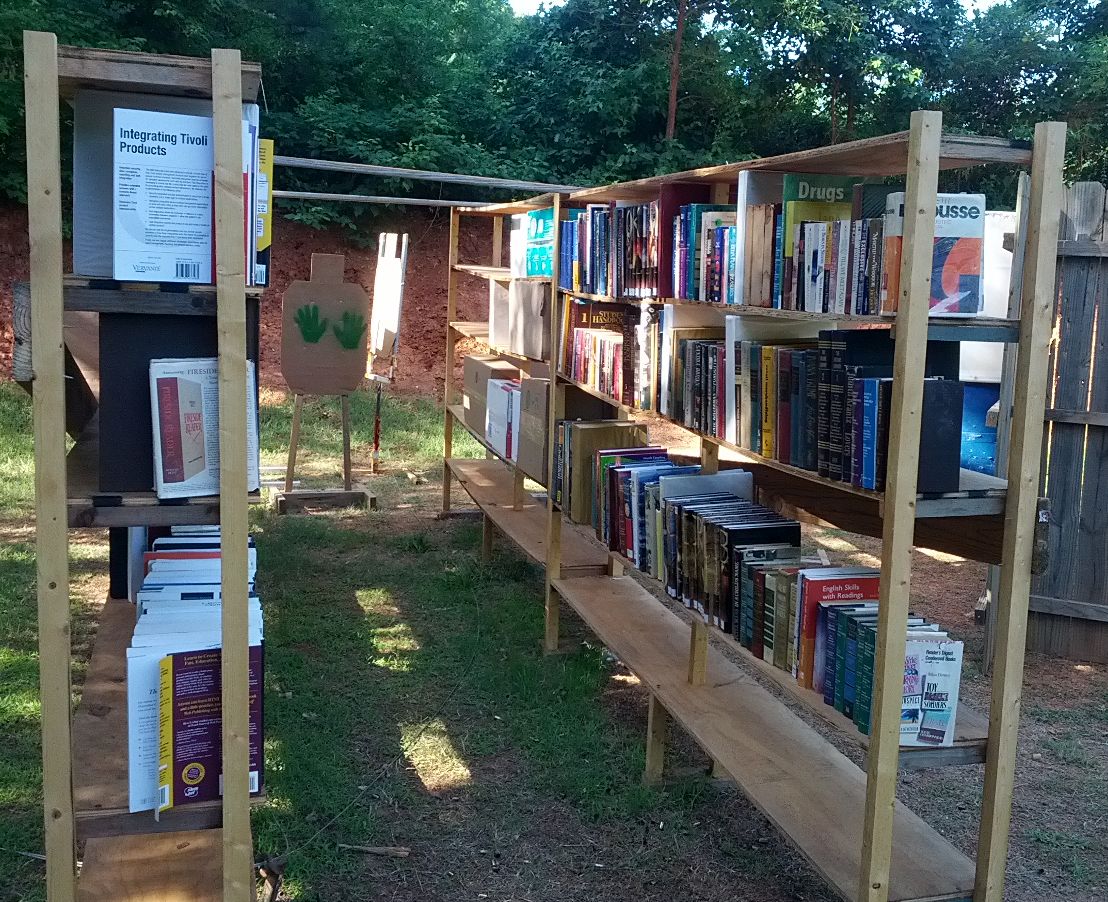
The “Library” was still in place, although a bit soggy, and I used one of the books to test penetration and expansion of the defensive rounds. Note the book on the top right shelf. It was wedged in tight and just the right height. It was also seriously thick, partly due to the rain soaked pages.
I put 3 round in on the right side of the front cover. My practice partner suggested I also put in 3 rounds from my regular ammunition. I shot a row of 3 on the left side of the front cover.
~ double Click to see detailed captions ~
I took the book off the shelf and started turning pages to see the impact patterns and find the lead and casings.
The defensive rounds penetrated 1110 pages. They torn much larger, irregular holes.
The practice round penetrated 1600 pages. The holes remained round and uniform.
If you are local and want a first hand look at the book, let me know and I’ll bring it to a match. I’ll hold onto it for a few weeks, then it will go into the recycling bin.
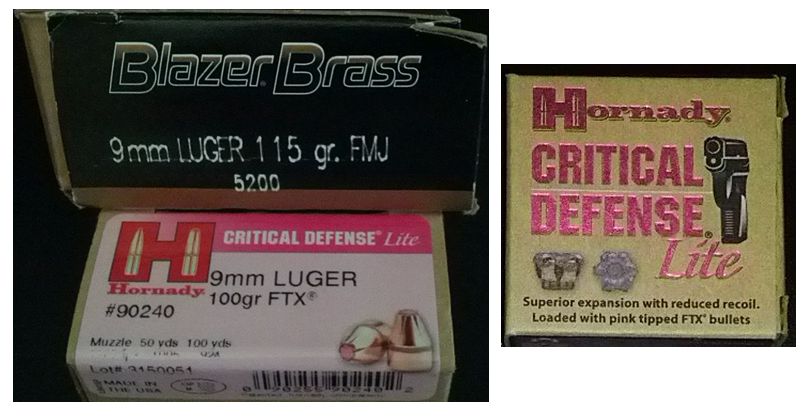
Here’s exactly what I was using:
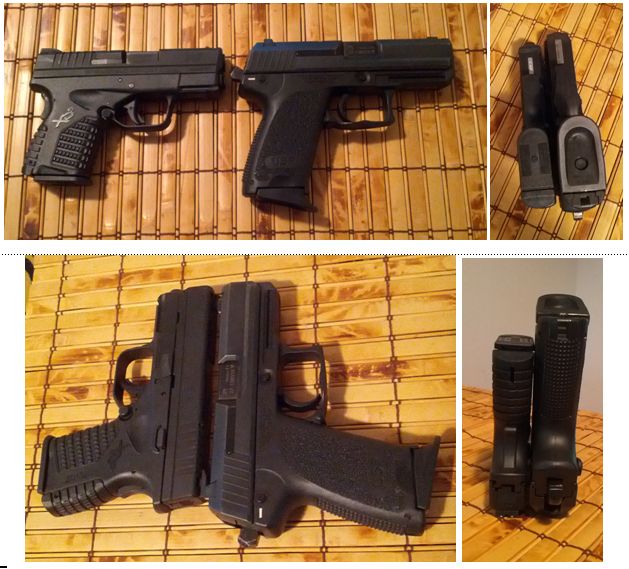
Practice rounds vs. Defensive rounds
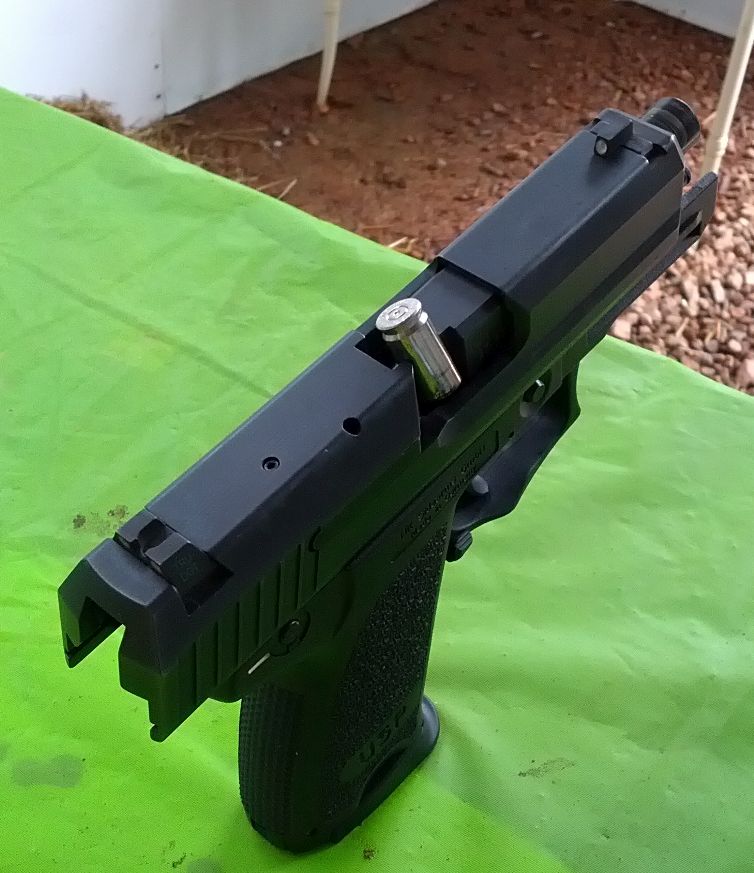
I really liked the lighter recoil of the defensive rounds but unfortunately they stove piped in both guns several times. That’s why you try ammunition in the gun you plan to use it with: to verify they work well together. I’ll go back and buy regular defensive rounds to test as the “Lite” version failed in my guns. Bummer but better to know now.
H&K USP Compact with stove piped defensive round
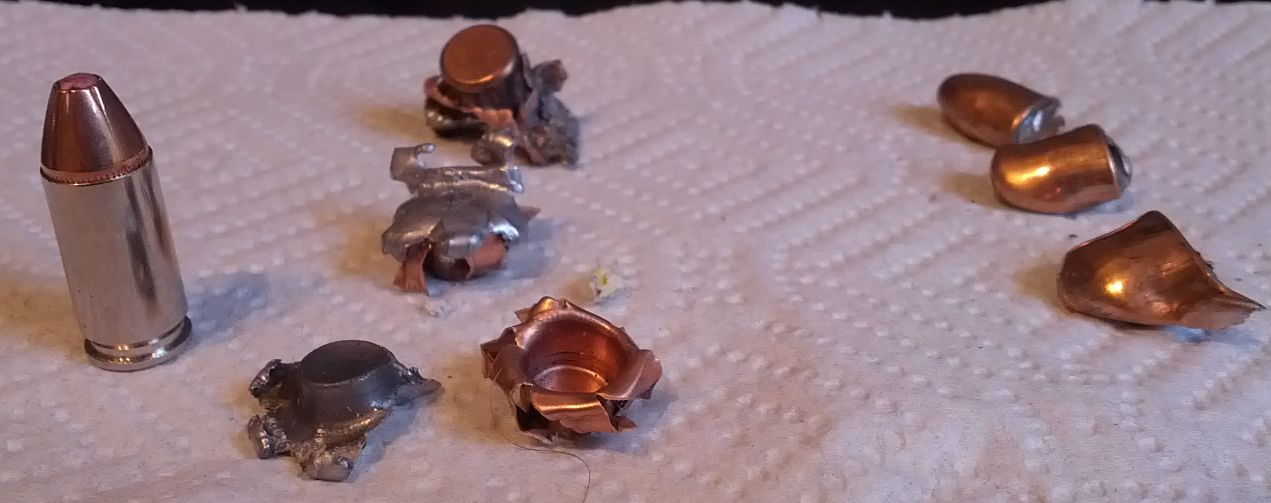
This was still a very interesting experiment for me. I know what the outcome is supposed to be but touching the book, turning the pages and digging out the lead and casings felt like an adventure! Here’s what I found:
Lead & Casings from the book! From left to right: Defensive round, defensive lead & casings, practice rounds (lead still in casing).
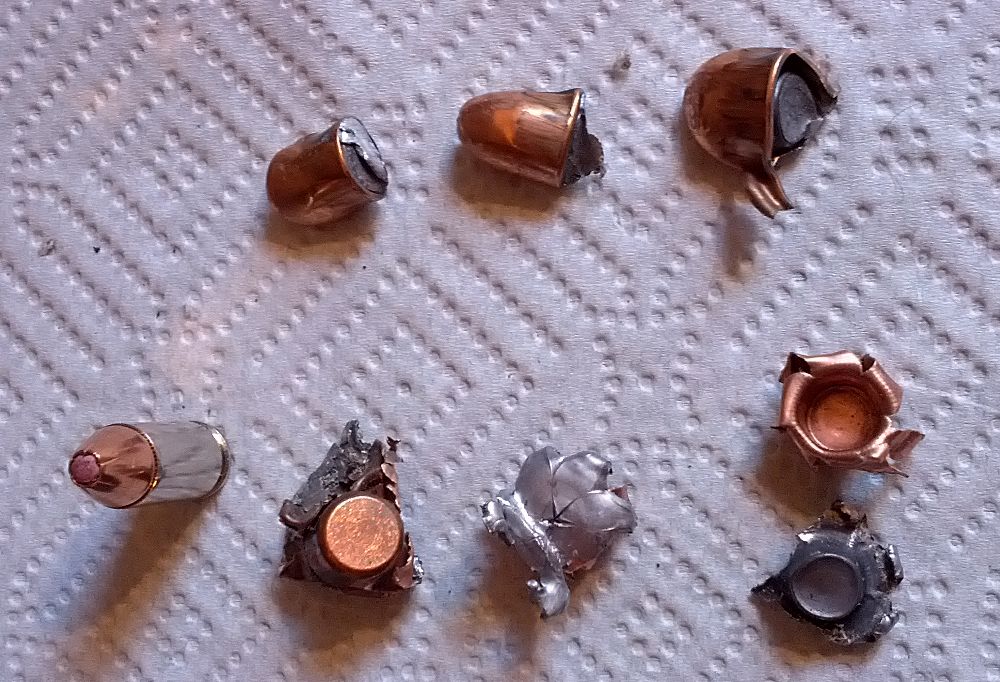
Another view of the lead and casings, Practice rounds at the top, defensive rounds (one unused ) at the bottom.
Finally, the obligatory water bottle video (because I couldn’t resist):
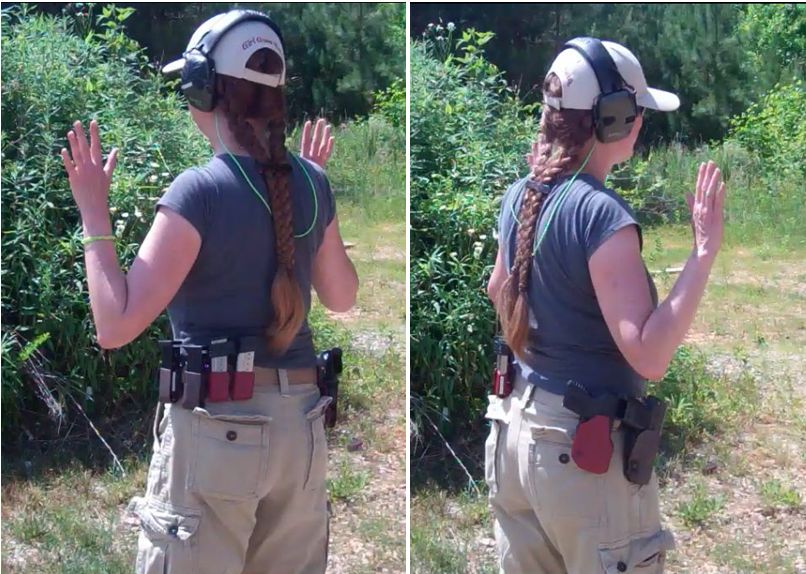
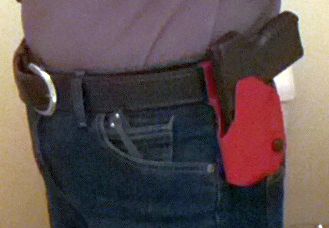
BUG Gear: 2 mags each gun (brown & red) + holsters for primary gun (brown) and backup gun (red)
I shot my first BUG Match Sunday May 31st at The Range in Oxford, NC. BUG stands for Back Up Gun. A “BUG” match incorporates both a primary gun and a backup gun.
Primary guns are loaded to 6 rounds
Backup guns are loaded to 5 rounds (although the IDPA rules concerning this change tomorrow (June 1st) and then require 6 rounds.
Roughly half the stages only require the backup gun (no primary gun).
No stage is shot with the primary gun only.
No stage requires a reload on the clock.
I opted to carry both in a holster, but a holster is only required for your primary gun. You can carry the backup gun in a gun case. When it’s your turn to shoot: uncase, load, shoot, unload, re-case.
For stages with both guns, there is a safe place to put down the primary gun after you’ve shot it.
The BUG is always picked up from a flat surface (or a trunk, or a dashboard, or a refrigerator door shelf, or a car seat…) but not from a holster.
Many of the shooters commented that they didn’t shoot their backup gun often and struggled with it somewhat. I shot mine for an Action Pistol match in March when I sent my 1911 back to S&W. I found that to be valuable experience prior to shooting this match.
For this match:
We started at 1pm and were done by 3:30pm.
I shot 68 rounds total.
My primary gun: H&K USP Compact in 9mm shot in SSP (Stock Service Pistol: decocked with a double action first trigger pull, followed by single action trigger pulls).
My “BUG”: XDS in 9mm.
Lessons Learned:
These are FUN matches!
I like shooting steel!
I thought I’d set the primary gun down softly but on the stage with the barrel positioned to swap guns, I bounced it a bit.
When I swapped guns in the SUV, I hesitated because it just felt like I needed to drop the magazine for a reload… which is how I usually shoot matches. So it takes a change in habits.
I’m getting better at shooting on the move.
I got 2 of 3 shots on the mover and didn’t hit the non-threat. So never stop trying new things.
In April 2015, I shot 4 different pistols. All were 9mm but for the most part were very different guns.
I started the month shooting the 1911 at an IDPA Match in Oxford.
I was so frustrated with the 1911, I decided to give CCP(concealed carry pistol division of IDPA) a try and switched to the Springfield XDS. I shot a match and an IDPA Classifier hosted at the Wake County Range the 3rd Saturday with this gun. I like the way it shoots, but I find it difficult to get the magazine to drop and I pinched my palm when reloading to the point of bruises. The grip is the “perfect” height to make that an issue.
I volunteered for a WOT event and had the opportunity to shoot a S&W M&P in 9mm. Not much shooting here, but enough to knock down 8 steel targets.
Finally,I switched to an H&K USP Compact after I shipped the 1911 to S&W. I didn’t know how long the 1911 would be gone or how well it would work when it came back. I have plans to shoot the Carolina Cup, so I needed to pick a pistol, stick with it and continue to practice. I bought the H&K about 3 years ago because it was a deal I just couldn’t turn down, however I really haven’t shot it much. It’s supposed to be reliable and after my experience with the 1911, that was appealing.
I could shoot the H&K in SSP (Stock Service Pistol) if I decock it and ensure the first shot is always a double action pull. Or I can shoot it in ESP (Enhanced Service Pistol) if I put on the safety and include taking the safety off each time I draw from the holster.
Since I can’t consistently reach the safety, I opted to start shooting SSP and learn how to deal with the double action trigger pull. I’ve found that to be challenging.
I made the switch May 6th when I took a half day off work to work on the IDPA Classifier. I worked on that again May 9th and shot another classifier, in Oxford this time, with the H&K in SSP on May 10th (Mother’s Day). I missed qualifying as Marksman by 3 seconds. My first trigger pull is painfully slow to avoid slapping the trigger and dropping the shot. So once again, something new to work on. I also am a bit too quick with the second shot due to the contrast in the trigger weight. I haven’t measured, but I wouldn’t be surprised to find that the H&K single action pull is as light as my 1911.
A final comment: When I got the 1911 back I shot it then shot the H&K. I didn’t think the H&K had much recoil until I shot them back to back… the 1911 makes it feel as if the H&K kicks. But I’m sticking with it for now.
This is a follow up to Part 1. If you don’t want to read the entire blog post, the final verdict: new trigger weight after replacing the springs and the sear: between 4 3/4 and 5 pounds.
Part 2:
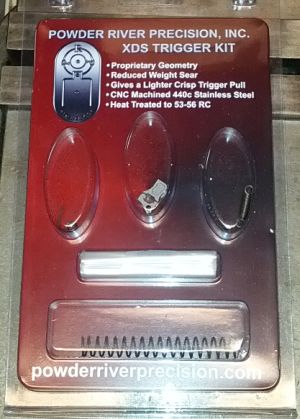
I finally received the Spring & Sear kit from Powder River Precision. It comes in a more costly but more professional looking package compared to the original spring kit. More to throw away after you unpackage the parts.
To install the sear, you have to take everything apart again that you disassembled to replace the springs. It’s non-trivial and frustrating to get everything lined up exactly right. I find this review from the Powder River website to be dead on:
” The video is pretty good, but in several places the demonstrator is holding the gun out of the camera range. Also the focus goes in and out. It’s obvious that he has done this a number of times, he goes really fast. There are a couple of parts that could use more clarity. A few of the springs are hard to figure out just because the kit is not marked for what spring goes where. Most importantly, when reinstalling the grip safety, there is a little lever that needs to be put in the exact right spot and the video doesn’t really show where. I put my gun back together with the lever off somehow and had to force the gun apart because the trigger would not trip. I then moved the lever around until it felt free, he tells you how to check it by having the grip safety locked by moving the trigger bar. Great trigger now, 4 hours later.”
So be sure to have an open block of time before attempting this. Here’s a comparison of the old and new sear:
Old and New Sear (with spring)
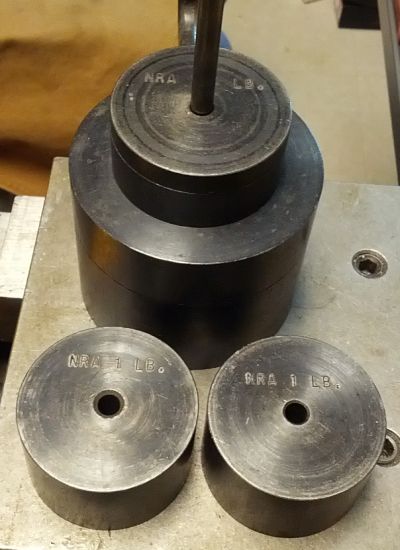
We re-tested the “before” weight with a calibration set of NRA certified Weights (always the most accurate way to measure). Previously we used a trigger pull gauge
but that is less accurate. We did take 3 measurements and averaged them to be as accurate as possible, but it appears that measurement was high, I had it listed at 6.5 pounds. When we measured again with the more accurate weight set, it tested at 5 3/4 pounds with the original sear.
NRA Certified Weights
You basically stack up weights until you can no longer pick up the stack with your trigger. Here’s the final test for my updated gun. Yes, I’m impressed by the simplest things:
Here’s a summary of the different trigger weights
Trigger weight before the spring kit: 8 lbs
Trigger weight after the spring kit: 5.75 lbs
Trigger weight after the sear replacement: 4.75 – 5 lbs
Yesterday morning, a well dressed man in business attire stopped me in the 5th floor lobby of the building I work in. He had a slightly apprehensive look, then just asked, “Didn’t I see you at the Wake County Range last Monday?” I laughed and answered, “Yes you did! I’ll be back there tonight.” It’s a small world. Our companies have suites on the same floor. He was at the match last night and thankfully he reintroduced himself because he looks quite different in a ball cap. We shot on different squads but I’m sure there will be future conversations. He did make me aware his co-workers aren’t really aware of his hobby, so I’ll have to tone down my enthusiasm for gun conversations in the building where we work. But, it really started my day on a high.
~~~~~
I shot the Wake County Action Pistol Match last night. From a performance perspective, it was probably hands down my worse match ever. A “mike” is a miss – as in “no holes in the target”. I had several. But I left with a smile and a feeling of contentment.
I started shooting because it was fun. I noticed along the way that at many matches, the competitors were friendly and chatty before the match. Conversations included:
what new gear they’d bought, what gun they were shooting,
how their day had been, how the family was,
what they had been practicing, what their specific goals were for the match, etc.
But at the end of the match there were many disappointed, disgruntled, and humbled competitors. Not performing as they had hoped just took all the fun out of the experience. Then it was mutters and grumbles about about missed targets, dropped points, fumbled magazines, and malfunctions. Not a state of mind I want to get sucked into.
I always come in at the bottom of the pack, so that’s nothing new. But up till last night I’d always hit the stationary targets. Well, last night I even missed some of those! It was so bad I had to just shake my head and laugh. “Wow. No shit? I totally and completely missed the entire target! And it wasn’t even moving!” To top that off, I had two tightly grouped shots in the dead center … of a non-threat. That non-threat was covering the lower part of a threat target. Things had gone by in such a blur that I didn’t honestly remember if I’d aimed at the top part of the target (and slapped the trigger to drop the shot) or if I’d just aimed at the center of mass.
I could list a string of excuses but as I pondered what the heck had happened it came down to this: I wasn’t totally focused on the fundamentals. So I thought about what had distracted me:
I’ve shot 3 matches in the last 10 days, including my first low light/no light match
I have had less than the usual amount of sleep. I managed to fit a trip to Minnesota into those 10 days.
I bought a Flip camera to record the matches. And I offered to film for a friend I made recently when looking for someone to carpool with to Oxford. The camera went dead after Stage 2. He & I shot back to back and I was more focused on passing the camera than thinking about the stage. Then it was :”Why did the @#$& camera stop working???”
I shot a different gun combo in each match: 1911 in 9mm once, then the 1911 with a flashlight, followed by the XDS.
I clearly was doing something different because my strong side forearm was seriously sore today. That hasn’t happened before.
I decided to just take all that into account and give myself a break. Bad guys do show up when you are tired. I carry the XDS so I need to shoot it. I want to learn skills for shooting in the dark. I really do want to capture some of this on video:it’s easier to explain to friends, family and co-workers what a match really is like. And I’m finally making friends so I do want to nurture those friendships.
OK, let me say that again: I’m finally making friends. That is huge. When you know you are going to spend 4+ hours around strangers and know you are not good at the one thing they care about, you arrive with a mix of apprehension and uncertainty. It is a very different experience knowing you will recognize faces, knowing it’s ok to ask “Can you film this for me?” and getting a smile and a hug when you arrive. Maybe that’s a girl thing, but it’s the reason I shot 3 matches in 10 days: I felt welcomed.
I shot poorly but I know I have work to do. That will never change. I was smiling because I had added a few more conversations to the foundation of a few friendships that I look forward to growing in the future. That made it an excellent evening!
~~~~~
Here are the two stages I got on video. My mom watches them… LOL. And blog posts are always better with pictures. This isn’t excellent shooting, but it’s safe shooting and you get to see what these matches are like:
He installed the spring kit back on February 7th. I brought him the gun, watched the entire procedure, then took the gun over to PDHSC later in the day just to verify everything was working. It shot fine. We watched the “how to” video and referred to photos he had taken when he’d done this in the past. The video is just over 15 minutes. It took my gunsmith longer to swap out all the springs because he was patient enough to let me ask questions throughout the process. There is no way I’d have done this. I did remember to ask that he test the trigger pull both before and after.
Trigger weight before the spring kit: 8 lbs
Trigger weight after the spring kit: 6.5 lbs
Trigger weigh of my S&W 1911: 3.25 lbs
They now have the sear available, although oddly, they only sell it with the spring kit. I wrote Powder River and mentioned I’d already bought the spring kit. I asked if it was possible to just buy the sear. The response: “We do not offer the sear as a stand-alone product at this time, but the price you pay is the cost of the sear, and our cost for the springs.”
My gunsmith thinks replacing the sear will take off another pound, possibly getting it down to 5 lbs. I asked him to order the sear, so as soon as I get that and get it installed, I’ll post another update (part 2).
I did shoot the XDS in the Wake County Action Pistol Match on February 25th. I bought a red holster and mag pouches for matches and this was the first time I used them.
Snow was predicted and it started as we finished up the match. Attendance was low due to the weather but I was glad I went. It was warmer than the January match. I had no malfunctions with the XDS and I never got cold. It was a good night. A few lessons learned:
Grip the gun very high up on the grip to avoid a NASTY pinch (and bruise) on my palm when I reload. The bottom of the magazine seems to hit just about the bottom of my palm and it seriously hurts if I slam in the magazine and pinch flesh.
If you have to turn before you shoot., turn in the direction of the gun
Don’t walk into a doorway to shoot – because it’s going to take time to back out and move to the next target.
I was overdressed. I didn’t need a down vest. We started off at 40 degrees and were still slightly above freezing when the match ended – even though we had snow dusting the cars when we headed home.
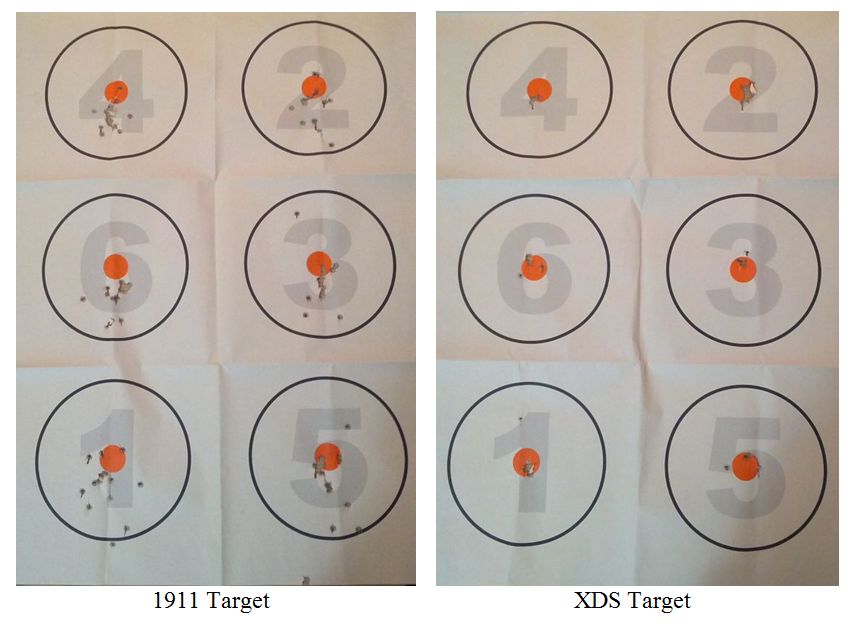
I took a trip to the range to practice shooting pairs: two shots at the same target with the focus on managing the recoil such that I could get the second shot off quickly. I focused on grip and trigger control. I shot about 50 rounds with my 1911 then decided to get in some practice with my XDS. I shot 26 rounds and called it quits. Here are the results:
The shots from the 1911 are, for the most part, in the 6 inch circles. The shots from the XDS are significantly closer to the orange centers.
It doesn’t make much sense because:
the 1911 has a longer site radius (5 inch barrel vs a 3.3 inch barrel)
the 1911 has a lighter trigger
The trigger on the XDS is much heavier. It was fighting it a bit and honestly stopped at 26 rounds because my trigger finger was so fatigued I didn’t feel that additional shooting would do more than burn ammo.
Clearly I’m accurate with the XDS. As a friend said when I showed him the targets, “That gun just fits you.” So I’ve opted to get a trigger job. Yes! My very first trigger job. I’m pretty excited.
I dropped it off with my gunsmith and I’m scheduled to pick it up Friday. Stay tuned for details. I have plans to shoot this gun in a bug match in the near future.
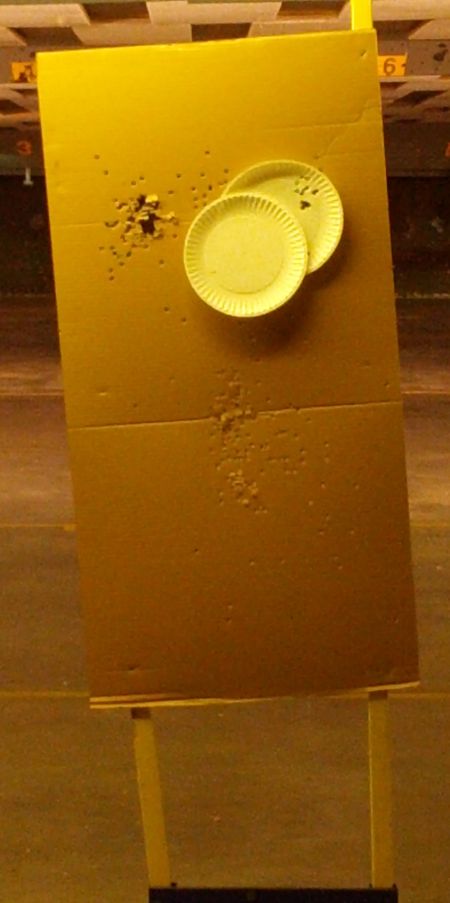
Don’t hit the good guy! (ie: the front plate). All shots one handed at 15 feet.
I attended the monthly gathering of the the Wake Country Ladies Handgun League (LHGL) last Saturday. I opted to shoot the advanced shooter drill as I wanted practice time and I wanted a challenge.
The drill this month was to shoot one handed then switch to the other hand. We didn’t use a holster for this drill, just picked up the gun from the bay table.
We started with 7 rounds loaded in the magazine and shot 4 strong hand, transferred the gun to the weak hand and finished up the last 3 shots.
Turns out the hard part of the transfer is getting the thumb of the shooting hand out of the way of the transfer hand. At least, that was my challenge.
I moved onto full magazines and transferring every 2 shots to practice the pass between hands. I realized after the fact that I may have gotten better results as neither hand was over tired by holding the gun for longer strings of shots.
To up the “ante” a bit, we overlapped paper plates, designated the front plate a non-threat (using IDPA terminology) and attempted to hit the back plate without “hurting” the non-threat. I posted a photo of my initial results with the first two magazines. No hits to the non-threat!
I used my XDS in 9mm for this exercise. I think the targets were out at about 15 feet.
To qualify for the advanced shooter drills with the LGHL you have to pass a basic gun handling safety test and a basic accuracy test with your shooting. It provides more challenge than just shooting downrange and adds skills to practice.
For most of the last year I’ve shot one of my guns at least once a week. I bought a gold membership at PDHSC and while that was in effect, it was an easy decision to go to the range and shoot. I’d limit myself to 100 rounds most visits and I’d be there about an hour.For some months I had a shooting partner and we would discuss drills and ideas, but most of those trips were solo.
During that time I’ve come along way with my gun handling skills and safety awareness. I remember early on when I’d pick up a magazine and I’d have to puzzle out which direction it should face when I put it in the gun. That is now something I don’t question.
I’ve shot competitions and I’m past the point of nerves and adrenaline. I’m reasonably competent but I’m not a competitive shooter. But that isn’t improving.
With the expiration of my gold membership, I’ve decided to rethink how I’m spending my “gun time”. Continuing to put lead downrange is fun, but I’m not convinced I’m structuring my range time to be productive.
Also, with the purchase of the XDS, I want to get comfortable with carrying a gun other than at the range and at a competition. That is what prompted the last post in carrying in the car — and I appreciate all the feedback on why I should not leave the gun in the car permanently.
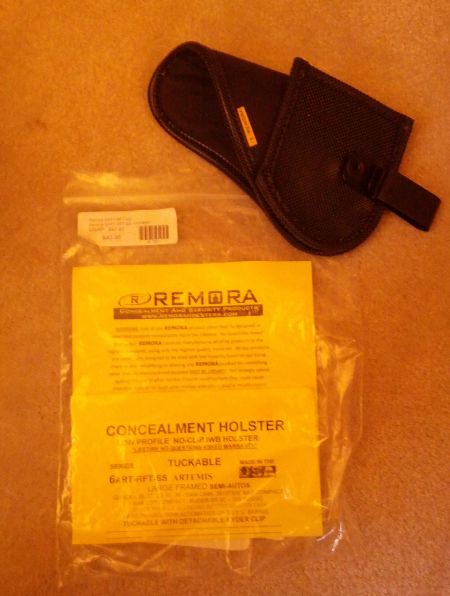
I bought a Remora Concealment Holster and intend to start carrying it around the house with the gun unloaded at first just to see how this works. It has a rigid opening and doesn’t collapse when the gun is drawn, it has a flap to make it “tuckable”, there is a clip but it can be removed (it snaps on), and it’s a “sticky” holster. I tried it on in the store at 9Forward and it felt comfortable.
However, I’ve drawn from it and it’s very different from the dropped, offset holsters I’ve been using for competition. It was at this point that I realized that I might want to switch my focus from “getting better at competition” to “getting better at self-defense”. I’m not going to be able to conceal a dropped offset holster unless it’s a very cold day and I have no plans to remove my coat, so I think I need to suck it up and start working with the equipment that is practical for everyday carry — even if it’s not designed with the easy access of a competition holster.
When I buy something, I like to use it. I’m up to four 9mm pistols at this point and I’m going through a process of deciding where each “fits” in my life — or whether to sell one of them.
I’ve parked the H&K in my bedroom. It’s the only gun I have with night sights.
When I bought the 1911 it replaced the XD9 as my competition gun (for now). I tried putting the XD9 in the car, but I wanted it in the center console. It’s too big. I can’t really reach the glove box quickly but I can pop the center console and access items next to me fast. So the XD9 went back in my range bag as a back up competition gun.
I have a CCW but I haven’t gotten comfortable carrying a loaded gun on my body outside of the range or competitions. So I decided my next baby step would be to carry in the car.
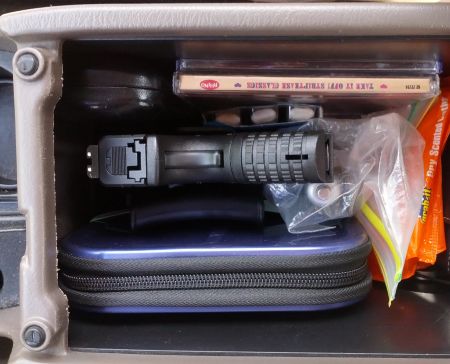
If you’ve been reading you know I bought the XDS in 9mm. It’s a perfect fit for the glove box. I took the holster that came with the gun and attached it to a heavy CD case (metallic blue with a zipper in the photo) using a rubber band in order to test out the concept. The holster keeps the gun upright and centered. The CD case keeps the holster in place when I draw the gun. I practice drawing at least once a day now and I’m happy with this system. I just want to find something more reliable than a rubber band to make it work.
The next time I’m at The Range and it’s fairly empty and dry, I will try driving my car out into a bay and practice a S L O W draw with a transition to shoot through the driver’s window and or passenger window.
At this point I have questions. So if you are reading and you are willing to share:
Do you carry in your car? Why or why not?
Where do you carry?
Do you leave the gun in the car full time or remove it once you are home?
I have many conversations with shooters but never with a consistent mentor and this is the kind of thing I will figure out on my own, but would really like pointers.


